Tuesday 30 June 2015

Connecting to your Database in Codeigniter


There are two ways to connect to a database:

Automatically Connecting

The "auto connect" feature will load and instantiate the database class with every page load. To enable "auto connecting", add the word database to the library array, as indicated in the following file:
application/config/autoload.php

Manually Connecting

If only some of your pages require database connectivity you can manually connect to your database by adding this line of code in any function where it is needed, or in your class constructor to make the database available globally in that class.
$this->load->database();
If the above function does not contain any information in the first parameter it will connect to the group specified in your database config file. For most people, this is the preferred method of use.

Available Parameters

  1. The database connection values, passed either as an array or a DSN string.
  2. TRUE/FALSE (boolean). Whether to return the connection ID (see Connecting to Multiple Databases below).
  3. TRUE/FALSE (boolean). Whether to enable the Active Record class. Set to TRUE by default.

Manually Connecting to a Database

The first parameter of this function can optionally be used to specify a particular database group from your config file, or you can even submit connection values for a database that is not specified in your config file. Examples:
To choose a specific group from your config file you can do this:
$this->load->database('group_name');
Where group_name is the name of the connection group from your config file.
To connect manually to a desired database you can pass an array of values:

$config['hostname'] = "localhost";
$config['username'] = "username";
$config['password'] = "password";
$config['database'] = "databasename";
$config['dbdriver'] = "mysql";
$config['dbprefix'] = "";
$config['pconnect'] = FALSE;
$config['db_debug'] = TRUE;
$config['cache_on'] = FALSE;
$config['cachedir'] = "";
$config['char_set'] = "utf8";
$config['dbcollat'] = "utf8_general_ci";

$this->load->database($config);
 
For information on each of these values please see the configuration page.
Or you can submit your database values as a Data Source Name. DSNs must have this prototype:
$dsn = 'dbdriver://username:password@hostname/database';

$this->load->database($dsn);
To override default config values when connecting with a DSN string, add the config variables as a query string.

$dsn = 'dbdriver://username:password@hostname/database?char_set=utf8&dbcollat=utf8_general_ci&cache_on=true&cachedir=/path/to/cache';

$this->load->database($dsn);

Connecting to Multiple Databases

If you need to connect to more than one database simultaneously you can do so as follows:

$DB1 = $this->load->database('group_one', TRUE);
$DB2 = $this->load->database('group_two', TRUE); 

Note: Change the words "group_one" and "group_two" to the specific group names you are connecting to (or you can pass the connection values as indicated above).

By setting the second parameter to TRUE (boolean) the function will return the database object.

When you connect this way, you will use your object name to issue commands rather than the syntax used throughout this guide. In other words, rather than issuing commands with:

$this->db->query();
$this->db->result();
etc...
You will instead use:
$DB1->query();
$DB1->result();
etc...

Reconnecting / Keeping the Connection Alive

If the database server's idle timeout is exceeded while you're doing some heavy PHP lifting (processing an image, for instance), you should consider pinging the server by using the reconnect() method before sending further queries, which can gracefully keep the connection alive or re-establish it.
$this->db->reconnect();

Manually closing the Connection

While CodeIgniter intelligently takes care of closing your database connections, you can explicitly close the connection.
$this->db->close();

Monday 29 June 2015

Database Configuration in Codeigniter


CodeIgniter has a config file that lets you store your database connection values (username, password, database name, etc.). The config file is located at application/config/database.php. You can also set database connection values for specific environments by placing database.php it the respective environment config folder.

The config settings are stored in a multi-dimensional array with this prototype:

$db['default']['hostname'] = "localhost";
$db['default']['username'] = "root";
$db['default']['password'] = "";
$db['default']['database'] = "database_name";
$db['default']['dbdriver'] = "mysql";
$db['default']['dbprefix'] = "";
$db['default']['pconnect'] = TRUE;
$db['default']['db_debug'] = FALSE;
$db['default']['cache_on'] = FALSE;
$db['default']['cachedir'] = "";
$db['default']['char_set'] = "utf8";
$db['default']['dbcollat'] = "utf8_general_ci";
$db['default']['swap_pre'] = "";
$db['default']['autoinit'] = TRUE;
$db['default']['stricton'] = FALSE;
 
The reason we use a multi-dimensional array rather than a more simple one is to permit you to optionally store multiple sets of connection values. If, for example, you run multiple environments (development, production, test, etc.) under a single installation, you can set up a connection group for each, then switch between groups as needed. For example, to set up a "test" environment you would do this:

$db['test']['hostname'] = "localhost";
$db['test']['username'] = "root";
$db['test']['password'] = "";
$db['test']['database'] = "database_name";
$db['test']['dbdriver'] = "mysql";
$db['test']['dbprefix'] = "";
$db['test']['pconnect'] = TRUE;
$db['test']['db_debug'] = FALSE;
$db['test']['cache_on'] = FALSE;
$db['test']['cachedir'] = "";
$db['test']['char_set'] = "utf8";
$db['test']['dbcollat'] = "utf8_general_ci";
$db['test']['swap_pre'] = "";
$db['test']['autoinit'] = TRUE;
$db['test']['stricton'] = FALSE;
 
Then, to globally tell the system to use that group you would set this variable located in the config file:
$active_group = "test";
 
Note: The name "test" is arbitrary. It can be anything you want. By default we've used the word "default" for the primary connection, but it too can be renamed to something more relevant to your project.

Active Record

The Active Record Class is globally enabled or disabled by setting the $active_record variable in the database configuration file to TRUE/FALSE (boolean). If you are not using the active record class, setting it to FALSE will utilize fewer resources when the database classes are initialized.
$active_record = TRUE;
 
Note: that some CodeIgniter classes such as Sessions require Active Records be enabled to access certain functionality.

Explanation of Values:

  • hostname - The hostname of your database server. Often this is "localhost".
  • username - The username used to connect to the database.
  • password - The password used to connect to the database.
  • database - The name of the database you want to connect to.
  • dbdriver - The database type. ie: mysql, postgres, odbc, etc. Must be specified in lower case.
  • dbprefix - An optional table prefix which will added to the table name when running Active Record queries. This permits multiple CodeIgniter installations to share one database.
  • pconnect - TRUE/FALSE (boolean) - Whether to use a persistent connection.
  • db_debug - TRUE/FALSE (boolean) - Whether database errors should be displayed.
  • cache_on - TRUE/FALSE (boolean) - Whether database query caching is enabled, see also Database Caching Class.
  • cachedir - The absolute server path to your database query cache directory.
  • char_set - The character set used in communicating with the database.
  • dbcollat - The character collation used in communicating with the database.
Note: For MySQL and MySQLi databases, this setting is only used as a backup if your server is running PHP < 5.2.3 or MySQL < 5.0.7 (and in table creation queries made with DB Forge). There is an incompatibility in PHP with mysql_real_escape_string() which can make your site vulnerable to SQL injection if you are using a multi-byte character set and are running versions lower than these. Sites using Latin-1 or UTF-8 database character set and collation are unaffected.
  • swap_pre - A default table prefix that should be swapped with dbprefix. This is useful for distributed applications where you might run manually written queries, and need the prefix to still be customizable by the end user.
  • autoinit - Whether or not to automatically connect to the database when the library loads. If set to false, the connection will take place prior to executing the first query.
  • stricton - TRUE/FALSE (boolean) - Whether to force "Strict Mode" connections, good for ensuring strict SQL while developing an application.
  • port - The database port number. To use this value you have to add a line to the database config array.$db['default']['port'] = 5432;
Note: Depending on what database platform you are using (MySQL, Postgres, etc.) not all values will be needed. For example, when using SQLite you will not need to supply a username or password, and the database name will be the path to your database file. The information above assumes you are using MySQL.

Friday 26 June 2015

Building Custom WordPress Theme

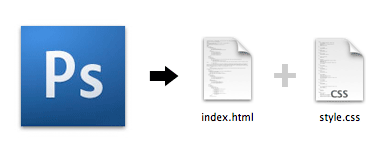
I will explain the basics of how WordPress theme works and show you how to convert a static HTML template into a theme. No PHP skill is required, but you need Photoshop and CSS skills to create your own design.


STEP 1. The Blog Frontend

Before you start, let's take a look at the WordPress default theme and see how it is structured. Take note of the elements (header, post title, search form, navigation, footer, etc.).


Default Frontpage (index.php)


Default Single (single.php)


STEP 2. Photoshop Mockups

Based on the information gathered from the default theme, design a Photoshop mockup of your blog. Here I'm using Mytheme, one of my free WordPress themes, as an example. Download the demo.zip to see the Photoshop file.


STEP 3. HTML + CSS

After the PSD design is done, create a static HTML+CSS template of each page. You can use my Mttheme HTML files in the demo.zip to follow this tutorial. Extract the zip and take a look at the index.html, single.html, and page.html. Later in the tutorial, I will use these HTML files and convert them into a theme.


Why Create a Static HTML File First?

Mainly because it will make the development process a lot easier. I usually create a HTML file for every template that I need, test it across all browsers, validate both HTML and CSS markups, then all I have to do is cut & paste the WordPress code. By doing so, I don't have to worry about HTML or CSS bugs during my theme making process.

STEP 4. How WordPress Theme Works

If you go the default theme folder (wp-content/themes/default), you should see many PHP files (called template file) and one style.css file. When you are viewing the front page, WordPress actually uses several template files to generate the page (index.php << header.php, sidebar.php, and footer.php).

 
For more details, check out Site Architecture and Template Hierarchy at Codex.
 

STEP 5. Duplicate The Template Files

Copy the My Theme HTML folder into the wp-content/themes folder. Then, go to the default theme folder, copy the comments.php and searchform.php file to the mytheme folder.
 

STEP 6. Style.css

Go to the WordPress default theme folder, open the style.css file. Copy the commented code at the top and paste it to the Mytheme style.css file. Change the theme name and the author information as you desire.


STEP 7. Splitting The Files

Now you need to understand where to split the file into several files: header.php, sidebar.php, and footer.php. The image below shows a simplified version of my index file and how the markups should split.

STEP 8. Header.php

Open the index.html file. Cut from the top to where the <!--/header --> ends, paste it in a new PHP file, and save the file as header.php.

Go to the default theme folder, open the header.php. Copy and replace the tags where it requires PHP code (Template Tag): <title>, <link> stylesheet, <h1>, and <div class=description>.

Navigation Menu (wp_list_pages)

Replace the <li> tags in the <ul id=nav> with <?php wp_list_pages('sort_column=menu_order&depth=1&title_li=');?>

Reference: wp_list_pages


STEP 9. Sidebar.php

Back to the index.html file, cut from where the <form id=searchform> start to the closing tag of <div id=sidebar> and paste it in a new PHP file, save it as sidebar.php.

  • Replace the <form id=searchform> wrap with <?php include (TEMPLATEPATH . '/searchform.php'); ?>.

  • Replace the category <li> tags with <?php wp_list_categories('show_count=1&title_li='); ?>

  • Replace the archive <li> tags with <?php wp_get_archives('type=monthly'); ?>

    References: wp_list_categories and wp_get_archives.


    STEP10. Footer.php

    Back to the index.html file, cut from the <div id=footer> tag to the end of </html> and paste it in a new PHP file, save it as footer.php.C

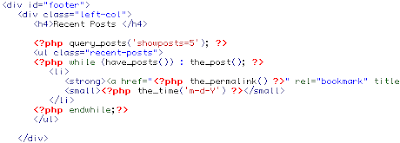
     Recent Posts

      Here I used the query_post to display the 5 latest posts.


      Recent Comments

      Recent comments are generated by a plugin (included in the theme folder).


STEP 11. Index.php

Now in your index.html file, you should only have the <div id=content> wrap. Save the file as index.php. Insert the line:get_header, get_sidebar, and get_footer in the same order as your layout structure.


.

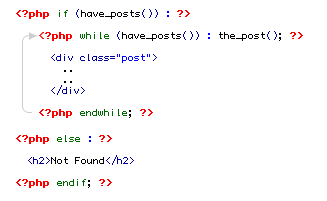
STEP 12. Understanding The Loop

The image below illustrates how The Loop works. The Loop is used to display blog posts and it also lets you control what to display. Basically, The Loop checks if there are posts in your blog, while there are posts, display it, if no post found, say "Not Found".


STEP 13.Copy The Loop

Go to the default theme folder, open the index.php file. Copy The Loop from the default index.php and paste it in between the <div id=content>..</div>. Then, replace the static text with the WordPress Template Tags: post date, title, category, comments, next and previous link.


STEP 14. Preview The Theme

Congrats! You've done the front page (the main part of the theme). Now, login to your admin panel, go to the Design tab, you should see the GlossyBlue theme, activate it and go to the front page to preview the theme.

STEP 15. Single.php

Now, it is time to do the single.php template. If you want, you can go through the same process — cut & paste from the default theme. But, I find it easier to use the index.php that you just created and save it as single.php. Open the default theme single.php file and copy the Template Tags over. Then include the comments_template. The image below highlights what I've changed:

STEP 16. Page.php

With the single.php template you just created, save it as page.php. Remove the post date, comment form, next/previous link... and that's it.. there goes your page.php template.

STEP 17. Delete The HTML Files

Delete all the HTML files in the glossyblue folder (we don't need them anymore). Technically, that is enough for a basic WordPress theme. You may notice there are more PHP files in the default theme. Well, you don't really need those files if you just want a basic theme. For example, if the search.php or 404.php is not present in the theme folder, WordPress will automatically use the index.php to render the page. Read the Template Hierarchy for more details.

STEP 18. WordPress Page Template

Ok, final example. I will show you how to use Page Template to create an archive page that will list all posts on your blog (good for sitemap). Copy the archives.php file from the default theme folder. Delete the unwanted code and you should have something like this:

Here I'm using the query_post (showposts=-1 means display all posts) to display a list of all posts.

Now, login to your admin panel, write a new page, title it Archives. On the Page Template dropdown, select Archives.


Converting a timestamp to PHP date format for a field in a node template


I have an imagefield, 'event_image' and printing all possible variables for the field tells me I have timestamp as a possible variable of the image to render. I use:

print '<pre>';
var_dump(get_defined_vars());
print '</pre>

// renders:
["timestamp"]=>
string(10) "1348629688"
... in node--mycustom.tpl.php to get the variables.
Now I can render the timestamp as such:

<?php print $node->field_event_image['und'][0]['timestamp'] ?>
 
... and it prints a UNIX formatted timestamp as:
1348629688
I'd like to convert this to a PHP date format. So I am guessing I would need to convert the UNIX timestamp somehow using the PHP gmdate function. Typically I would use something like this for raw php:
  $mytimestamp=1348629688;
  print gmdate("m-d-Y", $mytimestamp);
Which would take my timestamp and output:
09-26-2012
... but I just don't know how to do within the context of my drupal 7 field and the node template.

introduction to codeigniter framework


CodeIgniter is an Application Development Framework - a toolkit - for people who build web sites using PHP. Its goal is to enable you to develop projects much faster than you could if you were writing code from scratch, by providing a rich set of libraries for commonly needed tasks, as well as a simple interface and logical structure to access these libraries. CodeIgniter lets you creatively focus on your project by minimizing the amount of code needed for a given task.

CodeIgniter is right for you if:
  • You want a framework with a small footprint.
  • You need exceptional performance.
  • You need broad compatibility with standard hosting accounts that run a variety of PHP versions and configurations.
  • You want a framework that requires nearly zero configuration.
  • You want a framework that does not require you to use the command line.
  • You want a framework that does not require you to adhere to restrictive coding rules.
  • You do not want to be forced to learn a templating language (although a template parser is optionally available if you desire one).
  • You eschew complexity, favoring simple solutions.
  • You need clear, thorough documentation.